ISO, Aperture, and Shutter Speed. Three concepts that will strike fear in the hearts of any first time camera user.
I roughly remember from Freshman year TV production class, but they have long left my active memory, in this blog, I'll try to bring these concepts back into focus (camera pun, ik im hilarious). First, I played around with ISO, aperture, and shutter speed on my camera to remember roughly how it works, this reminded me that ISO, essentially adjusts the brightness of the shot. This could be very useful in my filming If I have to film something that is purposefully under or overexposed.
Playing around with aperture, it did something similar, but less stark and in a slightly different way that's hard to explain, this brought back memories and I believe that aperture physically changes the amount of light that the camera takes in. But, to get a better idea of how ISO, Aperture, and the third horseman of the apocalypse, Shutter speed all work, I started to do some more specific research.
Starting
with Aperture, my guess was not too far off, it describes a set of
small blades within the lens that control how much light is let in. This
changes not just the brightness of the shot, but also the depth of
field, how much of the shot is sharp. The higher the "F-stop", the
number that measures aperture, the less light is being let in. So for
instance, if during my filming I find that a shot is too dark an F-stop of 10, I could lower the F-stop for a brighter shot. However, there is also something else that makes Aperture unique and that is the depth of field focus. The smaller the aperture, i.e, the higher the f-stop, the more full the depth of field is. So for example, if I had to get a very wide establishing shot, where I want everything in sharp focus, I should use a high F-stop and adjust for brightness elsewhere. The graphic below, gives a very useful visual representation of aperture.
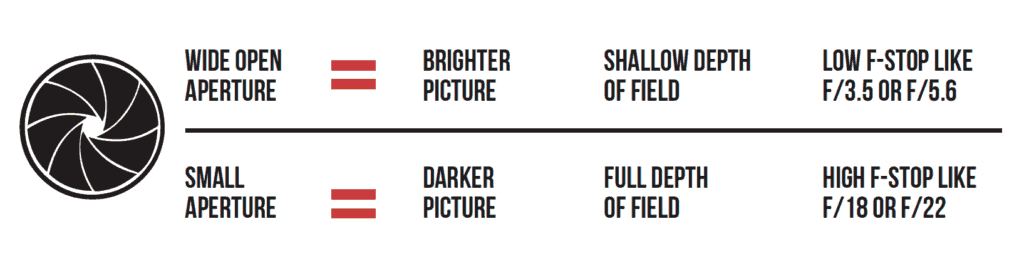 |
| A useful graphic provided by the article that shows exactly what F-stop would be best for which task. |
ISO, is out of the bunch, probably the most intutitive, as we use it all the time, in our phones automatically. ISO, digitally adjusts the lens's sensitivity to light. Higher ISO's create a brighter picture, Lower ISO's create a darker picture. However, there is a downside to high ISO's, as they create a more grainy picture.
 |
| Another very useful infographic, |
Shutter Speed is the one that going in I have the least knowledge knowing how it works. From what I can gather, Shutter speed controls how long light is taken in for each shot. This is measured in fractions of a second. For something like 1/800, Each shot is taken very very quickly, this creates minimal blur, but a darker picture. In comparison for a shutter speed like 1/2, each shot would take in light for a whole half second, which would create a brighter picture but a lot of blur. The rough calculation to create the best image is to maintain the Shutter speed as slow as possible while minimizing blur.
No comments:
Post a Comment